
Hi everyone. I have not gone toooooo far. I've missed blogging these past two weeks. Trust, I've been in blogland -- visiting some of my favorites, like Under A Cherry Tree. Well, a few days ago, I came across one of Jin's fabulous tutorials on making some Christmas tags using Silhouette Studio and the Cameo.
Since I do not have the Designer's Edition (...YET) of the Silhouette Studio, I had to figure out a "knock off" version of Jin's awesome tags!

Before I begin, you should know that I did used a Lettering Delights Cut-it Set, Merry Stitchy. I aslo used Inkscape to convert my files. (Inkscape is FREE.)
1. Start by drawing a rectangle 4" x 2". This would be your guide as to how big you want your tag.

2. Locate your desired cut-it file (in SVG) and open the SVG in Inkscape.

3. I chose Merry Stitchy 11, the Christmas Tree! In inkscape, select all (layers), and you can do this by hitting CTRL+ A. Then right-click and "group." After all layers are grouped, you can then save the file as a "PNG." I kept the file name Merry-stitchy-11, but you can rename to whatever you like. (Note: Please make sure that your image is inside the rectangle workspace. I found that if you save a file and a part of the image is outside the workspace, it will get cut off when it's opened in Silhouette Studio. You may need to adjust the size a bit.)

4. Go back to Silhouette Studio and open your PNG file. (Note: the file will open in a new tab. This is ok. We will copy and paste the image later.)

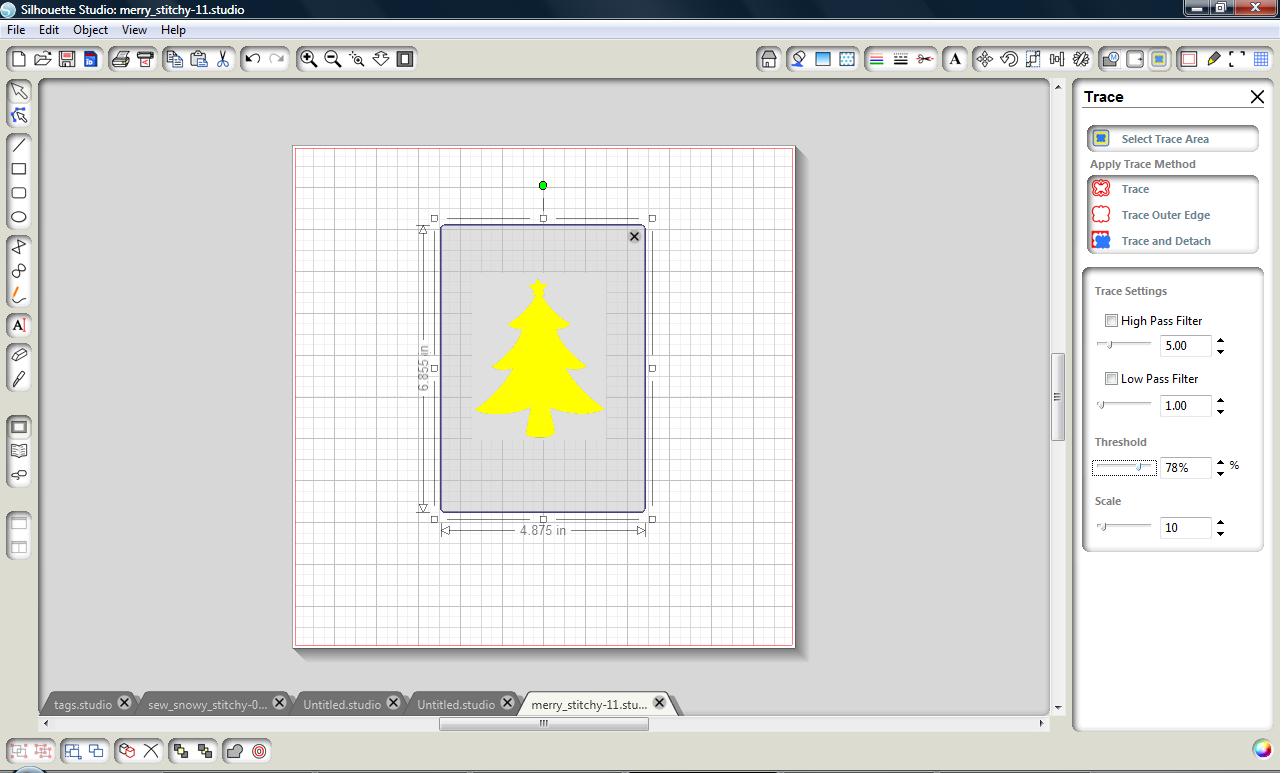
5. Using the trace tool, select the trace area (the entire image) until the entire image is yellow. I unchecked the high pass filter and set my thresshold to 78%. Select Trace and Detach.
6. Once your trace is complete using the Trace and Detach option, you may drag your image away from the white background that was attached when you opened the image. You can now delete the white background image by selecting it and hitting "delete."


7. Now you are left with just the tree. =) Select the tree and copy it (right click and copy or hit CTRL+ C.)


8. Head over to the original tab you started on and paste the tree there (right-click and paste or CTRL+ P). As you can see, my tree is much bigger than the 4" x 2" rectangle, so just resize to fit. Mine was about 1.9". Then you may select and delete the big tree.

9. Draw a rounded rectangle below the tree, about 1.030" h and 1.745 w.

10. Next, while your rectangle is selected, select the Line Style Tool. You want the small dashes (second option, just below the solid line). You can now play around with the line thickness until you see what you like. Mine is at 5.5 pt. Make sure your End Cap style is "rounded." This will create circles instead of rectangles or squares. (At this point, your original rectangle is no longer needed and you may delete it.)

11. Now it's time to create a shadow layer. Select both images and right-click and hit "offset." (If you have visited Jin's tutorial already, this is where I go back to her instructions and finish the tags.)

12. Because the line style for the rectangle is dotted, the shadow will come out like that too. It's ok. You just select the shadow dots and it turns into a solid line to follow the solid line around the tree.


13. Draw two circles. I made mine 0.3" and 0.1" and placed the small one inside the big one. This is for the hole you will be stringing your ribbon or twine through.
14. Select the two circles and place them on your shadow layer. Mine is at the top. Select just the bigger circle and the shadow layer and "weld" (right-click and select "weld").
15. Select the shadow layer and the small circle and change the line color to a gray (or whatever color you like - it will print with your tag).

16. Next, add your text and fill text in black. You're almost done!!

17. Finally, check your cut lines. Open the Cut Style window and you should see the shadow layer and the small circle lined in red. This will cut. If not, just select the layer(s) that have the red outline and set it to "no cut."

18. You are ready to replicate, print and cut! = )

My camera is going all crazy, so I couldn't take pictures of my actual tags... I'll try and update and post soon.
UPDATED!!


UPDATED!!


Please visit Jin at Under A Cherry Tree for the tutorial that inspired me to make these tags. =) If you have facebook, don't forget to "like" it too! (button is at the bottom of her post). = )
HAPPY CRAFTING!!
These are just too cute! You did great. I wish I had SCAL to use to make files :0( Thanks so much for sharing. The tutorial is OUTSTANDING.
ReplyDeleteBe Blessed, Beckie
awesome tutorial!!! thanks for putting this together!
ReplyDeleteYou know, I think I like them better without the backing paper like yours. Definitely much quicker. Love, love, love yours!
ReplyDeleteThe Happy Card Encouragement Factory
I'm really loving these Christmas trees. Great tutorial
ReplyDeleteCatarina